In this tutorial i will show you how to configure DNS server in Linux. We will learn to configure zone file and reverse lookup zone file.We will also learn about dns packages and dns services.We will also learn to change the ownership of files which we need to change.I have used Virtualbox for configuring and testing this DNS lab.The operating system i used for DNS server is RHEL5 and the DNS Client machines is WindowsXP.
Learn More server configuration on Linux.
DHCP SERVER Configuration in Linux.
NIS Server Configuration on Linux.
Apache server Configuration on Linux
The ip address for DNS server is 192.168.0.254 and domain name is xyz.com
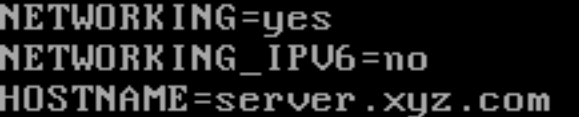
Step 1: set hostname to server.xyz.com
#vim /etc/sysconfig/network
Step 2:Check the ip address of your DNS machine.
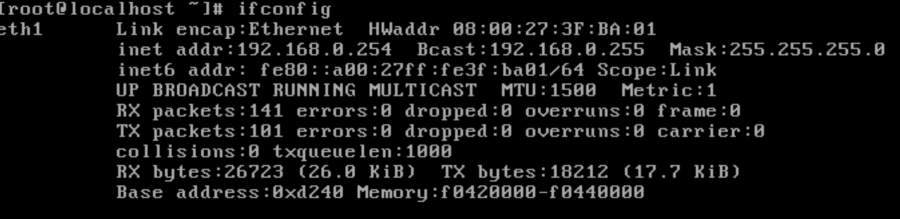
As i have assigned a static ip address to My DNS Machine and that is 192.168.0.254
step 3: Install bind package required for DNS.
# yum install bind* -y
Step 4: Change main configuration file of DNS named.conf
#vim /var/named/chroot/etc/named.conf

Step 5: Install caching-nameserver package reqiured for dns

Step 6:Configure ZONE FILES
I have defined two zone files xyz.com.zone for forward zone and 0.168.192.in-addr.arpa for reverse zone.
Remember that both These files will be stored in /var/named/chroot/var/named/ directory.
I will use two sample files for creating these both files.
Step 7:Change directory to /var/named/chroot/var/named and copy the sample files to name which we have set in named.conf

Step 8: Now open and edit forward zone file xyz.com.zone

Step 9:Now open reverse lookup zone file 0.168.192.in-addr.arpa
Open reverse lookup zone file and edit for reverse dns configuration


Lets Understand DNS Records:
A : stands for Address Record
AAAA : stands for IPV6 Address Record
CNAME : Alias of one name to another
MX : Mail Exchange Record
NS : Name server Record
PTR : Pointer Record (Pointer to a Canonical name)
SOA : Start of a Authirity record
Step 10:Now changed the ownership of these zone files to named group

step 11:Now start the named service

Step 11: Testing DNS on Clinet machine Which is windowsXP here.

Check IP Address of your DNS Client Machine:

Discover more from Learn Linux CCNA CCNP CEH CISSP CISA Penetration-Testing Bug Bounty IPv6 Cyber-Security Network-Security Online
Subscribe to get the latest posts sent to your email.
