In this article i am going to show you how to create Digital certificate using openssl command line tool.we will also learn how to generate 4096 bit Private key using RSA Algorithm and we will also learn how to create self signed ROOT CA Certificate through which we will provide an Identity for ROOT CA.
We will learn how to generate an another 4096 bit Private key which will be used to generate our subordinate CA which will used for actual signing.
We will also learn how to request a certificate for subordinate CA. We will also also learn how to decode certificates on your own computer, run this OpenSSL command.
I will show you how to check a certificate and key before applying them to your server.We will learn to Check the SSL key and verify the consistency.
We will also learn how to Check a certificate and return information about it (signing authority, expiration date, etc.).
Also see how to Verify the CSR and print CSR data filled in when generating the CSR.
To understand digital certificate scenario and concept i am going to illustrate it with the help of an example.
Let us suppose A person (sender), who is sending an encrypted message may obtain a digital certificate from a CA(Certificate Authority) to ensure authenticity.Here sender can be anyone and can be from any platform whether Windows,Linux or MAC.
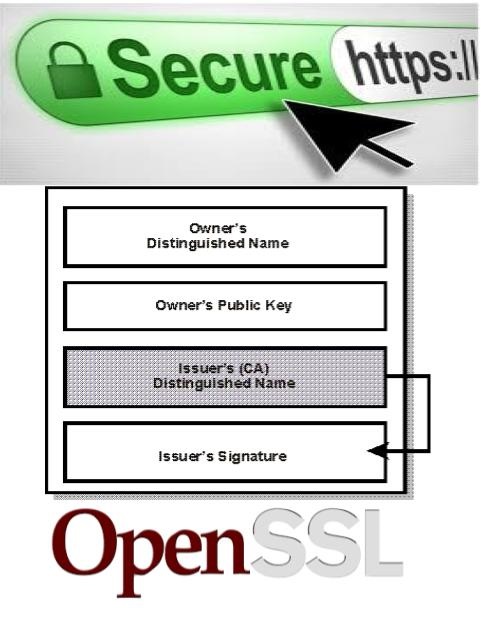
The CA(certificate authority company) issues the digital certificate with the applicant’s public key, along with other information such as certificate holder name, serial number, date of expiration and a digital CA signature. keep in mind that It also issues its own public key in the public domain via the Web with the help of web browsers.
When a message is transferred, a digital certificate serves as an encrypted attachment containing the public key and other relevant identifying data and When the recipient receives the message, the digital certificate is decoded using the CA’s public key. Using various information residing in the digital certificate, the recipient can send an encrypted reply back to the sender.
Remember that we use Digital certificates to verify website authenticity and legitimacy. A browser(whether it is Firefox,chrome,opera etc) may display an unsafe digital certificate alert but still permit user entry.
Note:This warning signals that the website is a threat and at a security risk.

What is Certificate Authority(CA)?
Actually it is a Trusted organization that issues certificates for both Servers and Clients.
The most common digital certificate standard is X.509.

First I will generate 4096 bit Private key using RSA Algorithm.
step 1:generate 4096 bit Private key using RSA Algorithm
[root@hacking]#openssl genrsa -out ca.key 4096
step 2:Then I will create self signed ROOT CA Certificate through which we will provide an Identity for ROOT CA.
[root@hacking]#openssl req -new -x509 -days 1826 -key ca.key -out ca.crt
step 3:now I will generate an another 4096 bit Private key which will be used to generate our subordinate CA which will used for actual signing.
[root@hacking]# openssl genrsa -out ia.key 4096
step 4:Now request a certificate for subordinate CA.
[root@hacking]# openssl req -new -key ia.key -out ia.csr
step 5:Now using all above keys and certificates we will start a process in which we will request for the subordinate CA
certificate and get signed by ROOT CA
[root@hacking]#openssl x509 -req -days 730 -in ia.csr -CA ca.crt -CAkey ca.key -set_serial 01 -out ia.crt
step 6:How to create a PKS#12 Certificate.
Remember PKS#12 Files can be exported and imported by a number of applications incuding Microsoft IIS.
[root@hacking]# openssl pkcs12 -export -out ia.p12 -inkey ia.key -in ia.crt -chain -CAfile ca.crt

Enter Export Password:

Verifying - Enter Export Password:
Let’s Check the Keys and Certificates created above.
[root@hacking]# ls

ca.crt ca.key ia.crt ia.csr ia.key ia.p12
step 7:How to decode digital certificates.
If you want to decode certificates on your own computer, run this OpenSSL command:
[root@hacking]#openssl x509 -in ca.crt -text -noout
Description:
It can be useful to check a certificate and key before applying them to your server. The following commands help verify the
certificate, key, and CSR (Certificate Signing Request).
step 8:Check a certificate
Check a certificate and return information about it (signing authority, expiration date, etc.):
[root@hacking]# openssl x509 -in ca.crt -text -noout
step 10: How to Check a ssl key
Check the SSL key and verify the consistency:
[root@hacking]#openssl rsa -in ca.key -check
step 11:How to Check a CSR File
Verify the CSR and print CSR data filled in when generating the CSR:
[root@hacking]#openssl req -text -noout -verify -in ia.csr
step 12:Verify a certificate and key matches
These two commands print out md5 checksums of the certificate and key; the checksums can be compared to verify that the
certificate and key match.
[root@hacking]#openssl x509 -noout -modulus -in ca.crt| openssl md5
[root@hacking]#openssl rsa -noout -modulus -in ca.key| openssl md5

Discover more from Learn Linux CCNA CCNP CEH CISSP CISA Penetration-Testing Bug Bounty IPv6 Cyber-Security Network-Security Online
Subscribe to get the latest posts sent to your email.

Did you ask my permission on link on to add you? Well work some on this and I’ll help you set up profile ok
LikeLike
Thanks I found a hacker she to kinda teach me code just stared ill get name it’s free but your sounds better
LikeLike
[…] https://linuxtiwary.com/2018/09/24/how-to-create-self-signed-ca-certificate-using-openssl/ […]
LikeLike
Hey There. I found your blog using msn. This is a very well written article. I will be sure to bookmark it and return to read more of your useful info. Thanks for the post. I抣l definitely return.
LikeLike