RIPng or RIP on IPv6 configuration Lab (A cisco packet Tracer Lab)
RIP for IPv6 also commonly referred as RIPng is designed to support IPv6.
If you are planning to shift on IPV6 from IPv4 then you must know how to configure RIP on IPv6 or RIPng(RIP Next Generation).Here in this tutorial i am going to show you how to configure RIP over IPv6. This is an example cisco packet tracer lab showing you RIPng configuration using IPv6. Altough if you are Interested in Learning IPv6 You can Also Read Below Articles on IPv6.
Static Routing Configuration using IPv6
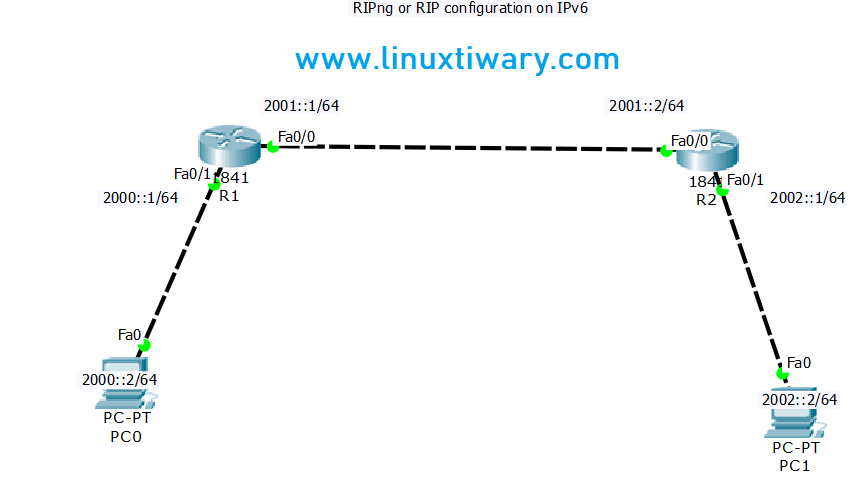
Draw the Topology Diagram:
Assign IPv6 Address as mentioned on Each Router Interfaces.
Step 1: Enable IPv6 RIP Routing protocol in Cisco Router R1
Router>enable

Router#config t

Enter configuration commands, one per line. End with CNTL/Z.

Router(config)#host R1

R1(config)#ipv6 unicast-routing

R1(config)#int fa0/0

R1(config-if)#ipv6 add 2001::1/64

R1(config-if)#ipv6 rip satish enable

R1(config-if)#no shut

R1(config-if)#exit

R1(config)#int fa0/1

R1(config-if)#ipv6 add 2000::1/64

R1(config-if)#ipv6 rip satish enable

R1(config-if)#no shut
Step 2: Enable IPv6 RIP Routing protocol in Cisco Router R2
Router>enable

Router#config t

Enter configuration commands, one per line. End with CNTL/Z.

Router(config)#host R2

R2(config)#ipv6 unicast-routing

R2(config)#int fa0/0

R2(config-if)#ipv6 add 2001::2/64

R2(config-if)#ipv6 rip satish enable

R2(config-if)#no shut

R2(config-if)#exit

R2(config)#int fa0/1

R2(config-if)#ipv6 address 2002::1/64

R2(config-if)#ipv6 rip satish enable

R2(config-if)#no shut
Step3: Show RIPng database
R1#show ipv6 rip database
 RIP process "satish" local RIB
 2001::/64, metric 2
 FastEthernet0/0/FE80::230:F2FF:FEA3:5701, expires in 177 sec
 2002::/64, metric 2, installed
 FastEthernet0/0/FE80::230:F2FF:FEA3:5701, expires in 177 sec
Step 4: Show Ipv6 Route
R1#show ipv6 route

IPv6 Routing Table - 6 entries

Codes: C - Connected, L - Local, S - Static, R - RIP, B - BGP

U - Per-user Static route, M - MIPv6

I1 - ISIS L1, I2 - ISIS L2, IA - ISIS interarea, IS - ISIS summary

O - OSPF intra, OI - OSPF inter, OE1 - OSPF ext 1, OE2 - OSPF ext 2

ON1 - OSPF NSSA ext 1, ON2 - OSPF NSSA ext 2

D - EIGRP, EX - EIGRP external

C 2000::/64 [0/0]

via ::, FastEthernet0/1

L 2000::1/128 [0/0]

via ::, FastEthernet0/1

C 2001::/64 [0/0]

via ::, FastEthernet0/0

L 2001::1/128 [0/0]

via ::, FastEthernet0/0

R 2002::/64 [120/2]

via FE80::230:F2FF:FEA3:5701, FastEthernet0/0

L FF00::/8 [0/0]

via ::, Null0
Step 5: Check IPv6 Routing Protocol
R1#show ipv6 protocol

IPv6 Routing Protocol is "connected"

IPv6 Routing Protocol is "static"

IPv6 Routing Protocol is "rip satish"

Interfaces:

FastEthernet0/0

FastEthernet0/1

Redistribution:

None
Discover more from Learn Linux CCNA CCNP CEH CISSP CISA Penetration-Testing Bug Bounty IPv6 Cyber-Security Network-Security Online
Subscribe to get the latest posts sent to your email.

Good one
http://www.routexp.com
LikeLiked by 1 person
What’s up everyone, it’s my first pay a visit at this site, and paragraph is in fact fruitful for me, keep up posting these types of articles.
LikeLike